Blog Pages

Tuesday, July 30, 2013

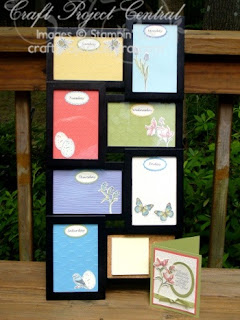
FLORAL BEDROOM ENSEMBLE

A bedroom is a special place for rest and relaxation.  This Floral Bedroom Ensemble adds a romantic touch to your serene space.  This ensemble features a decorated frame, a light switch cover, an altered CD doorknob sign and a beautiful card for presenting this set as a gift!   
This is the July Bonus project at Craft Project Central and was designed by Michelle.

Monday, July 29, 2013

"MAKE-IT-SNAPPY-MONDAY"

I wish Stampin' Up! had not retired the Perfectly Preserved stamp set.  If you ask me, they laid it to rest way too soon.  Jars (dies, stamps, and the real thing) are so trendy right now, and there are many creative uses for them.  For today's MISM project, I paired the simple boat image from Settin' Sail with the jar, stamping both on top of the manifest image from Perfectly Preserved.  Notice the embossed print background?  I used the Pretty Print embossing folder that will be available on August 1, along with many other brand new goodies.  My card stock colors are Whisper White, Crumb Cake, Pacific Point, Gumball Green, and Marina Mist.

Saturday, July 27, 2013

YUMMY BREAD & JELLY GIFTS

Summertime means lots of in-season garden goodies like rhubarb, zucchini, green beans, and strawberries!  It’s fun to share these goodies with neighbors, friends, and family.  Giving these gifts in pretty packaging makes them almost too good to eat!  This project includes packaging, as well as recipes wrapped up in a pretty sack!
I can only hope that some kind soul will one day ring my doorbell and wait to hand me any one of the goodies pictured above.  They could even leave it on the porch for me to discover!  Jen designed this ensemble, and her complete tutorial can be found at Craft Project Central.

Friday, July 26, 2013

"FREESTYLE FRIDAYS"

It's Julie's turn to share a Freestyle Fridays project this week, and this is the sneak peek photo that she shared with me.  Are those stamped roses on her project????  I can see a pretty die-cut and some silver embossing, but we'll have to visit her blog to see the whole project.  Don't forget to leave a little comment love while you're on her blog.  ;-)

Wednesday, July 24, 2013

NATURALLY SUMMER GARDEN GIFT SET


Summer is here, and this set of projects brings the sunshine of summer gardens and the beauty of nature into a lovely handmade gift, which is complete with coordinating gift bag and card.  Use the mini album for your summer photos or as a perfect gardening journal.  
Candy designed this gorgeous project, and her tutorial can be found at Craft Project Central.

Tuesday, July 23, 2013

A QUICK AND EASY HELLO

I was out and about yesterday and couldn't resist buying some contraband which, in this case, consists of the non-Stampin' Up! die-cut felt flowers and ribbon that I used on this card.  The felt flowers were half-price, and I loved the assorted sizes and bright colors.  And then when I saw the floral ribbon . . . well . . . who could resist?  As for the gingham ribbon, I think gingham must be my favorite because I am simply drawn to it.  It works with just about anything and doesn't scream "look at me, look at me!"  It lends the right amount of [subtle] detail.  Did you notice the stitching at the top of the hello flag?  Yes, that's REAL stitching and it's REALLY holding that flag to the card and I REALLY did it myself--by hand.  Is it cheating that I used one of Stampin' Up!'s Essential Paper-Piercing Pack templates to first pierce the holes?  If so, then call me a cheater.  It worked really well to have the holes straight and perfectly aligned!  The stamped hello and the chevron background are from Stampin' Up!'s June My Paper Pumpkin Kit, and my card stock colors are Whisper White and Pistachio Pudding.

Monday, July 22, 2013

A BISH-FIRD FOR "MAKE-IT-SNAPPY-MONDAY"

For today's MISM project, I used a stamp that I have never inked before.  All along, I thought it was a fish . . . until it looked like a bird.  And then I wasn't sure which end was supposed to be up.
 
I turned it around, and it looked sort of like a fish, but surely two of the hearts weren't supposed to be upside-down. And then I decided that it must not be a fish.  And are those trees or flowers on its sorta-chin-by-the-fallen-fin?
See what I mean?

A fish, a bird, a bish, a fird . . . regardless of what the creature is, I decided to complete the card.  After all, I had already stamped the image on my pretty die-cut and embossed white layer.  To create this pretty layer, I first used one of Stampin' Up!'s Labels Collection Framelits dies to cut the card stock.  I then laid two smaller Labels Collection Framelits dies on the card stock and embossed (rather than cut) them.  It's a very pretty look, don't you think?


Sunday, July 21, 2013

MEMO BOARD


This beautiful picture is really a memo board to help organize your week. You can write on the glass with a dry erase marker. There is even a corkboard with a notepad at the bottom. Keep it for yourself or give it as gift with the matching card. You will be surprised at how easy this is to create!

Chris designed this pretty project, and her tutorial can be found at Craft Project Central.

Saturday, July 20, 2013

HANDMADE FLOWERS IN A "WISH-IT-WAS-REALLY-VINTAGE" JAR

I love blue glass even if it's not the real thing from many years ago.  My great-grandmother (her name was Icie) used to have a lot of bottles--assorted shapes and sizes--sitting in the windows of her dining room, and the sun coming through, illuminating the assorted colors, always looked so pretty.  I would have loved to have ended up with some of those bottles, especially the dark blue ones, but my great-uncle (being the mean-spirited person that he was) probably tossed them in the trash.  There was never an opportunity to go through grandma's things and choose a keepsake.  I can remember going in her attic one time--only ONE time--and it was full!  There were some trunks, which I always assumed must be full of treasures, so the attic would have been my preferred place to start searching for a keepsake.  And, of course, the windows in the dining room.  I'm sharing today a Ball jar that I decorated to use as a vase for my handmade flowers.  See that burlap ribbon?  What's not to love about that????  When I bought the jars (a set of six), I had absolutely no idea what I would do with them, and I knew that I really shouldn't bring them home just because they were pretty, but an impulsive twinge tossed them in the cart as I headed toward checkout.  If not for those impulses, my stamp room would probably look really bare.  In case you're wondering, the other five jars are neatly stacked on top of an Expedit unit, waiting to serve some sort of purpose.  Stampin' Up! products used to create this project include:  Loving Thoughts stamp set, burlap ribbon, Tea Lace doily, crochet trim, natural trim, button, large rhinestone jewel, hemp twine (retired), Crumb Cake, So Saffron, Early Espresso, Wild Wasabi, Gumball Green, and Real Red card stock, 7/8" Scallop Circle punch, Blossom punch, and the retired Blossom builder punch (can't recall the name of it).

Friday, July 19, 2013

"FREESTYLE FRIDAYS"

Last Friday, Julie shared a masculine card with texture and glimmer and issued a mission for me to create a project this week with a similar theme . . . something masculine with "shine".  Her glimmery stars were hard to beat or maybe they just got planted in my head, but I couldn't make myself come up with any other form of "shine" for my creation.  It's been a while since I have used Stampin' Up!'s glimmer paper, and Julie totally inspired me to use some glimmery stars on my project.
Additional Stampin' Up! products used to create this card include Midnight Muse, Wild Wasabi, Smoky Slate, Early Espresso, and Whisper White card stock, Happy Day and The Great Outdoors stamp sets, retired star punch, and retired silver cord. 

Thursday, July 18, 2013

CARD FILE BOX SET

This card file box is great for keeping your cards organized.  The project includes eight cards with envelopes, but more can be put in the box.  There are also four dividers inside to help keep your cards filed by type.  This box would also work great as a recipe file box.  Make one as a gift and one for yourself! 
I love how colorful this project is, and it's a perfect gift for someone this summer!  Christy Fulk, who designed this project, does a great job creating cheerful, colorful projects.  Her complete tutorial can be found at Craft Project Central.
 

Tuesday, July 16, 2013

ANCHORS AWAY . . . A VIEW FROM THE PORTHOLE

I received a Stampin' Up! order last Friday that included the brand new Settin' Sail stamp set, which I needed to complete this card.  I used that set to stamp the flags for the banner, the "Anchors Away" sentiment, and a sentiment stamped on the inside of the card that reads "Life is better at the beach".  I made this card for my sister, who will step on a cruise ship soon.  Other Stampin' Up! products used to create this card include:  Sizzix 3" and 3-1/2" Circle dies, Cloudy Day embossing folder, Sizzix Tasteful Trim die, Whisper White, Pool Party, Bermuda Bay, and So Saffron card stock, mini brads, Stampin' Dimensionals, sponge dauber, Baker's twine, and Sizzix Happy Whale Clearlits die.  I hope port authorities remember my sister's face and will let her step off of the ship so that she can come back home.  Having a passport would make things go more smoothly, but it's a little late for that.  ;-)

BIRTHDAY CAKE EXPLOSION BOX GIFT SET

This beautiful gift set will have you all ready to give a fabulous birthday gift! The gift box is an explosion box that has a cute birthday cake in the middle and a pocket in each box side that can hold a gift card or a note. The gift bag is perfect for those slightly larger gifts, and the matching greeting card has you ready for your next birthday party!

I love this festive ensemble, which was designed by Amanda.  The tutorial is available at Craft Project Central.

Monday, July 15, 2013

"MAKE-IT-SNAPPY-MONDAY" AND A "MORE BANG FOR YOUR BUCK" DIGITAL DESIGN IDEA

During Stampin' Up!'s recent professional print pricing sale (for projects designed using My Digital Studio), I took the opportunity to design several cards (mostly using a trifold card template) that I could embellish as needed, and this is one of the designs:
One thing that I really like about trifold cards is that they offer three little design opportunities (each panel can be treated separately), but what I like most is being able to have a nice card on hand that was digitally designed and still has a uniqueness about it.  I'd like to point out yet another design opportunity with the trifold card template . . . instead of using it as one trifold card, you could always design each panel independently to be cut apart (after the cards have been professionally printed) and used on three separate card fronts!  How sweet is that?!?!  For less than $2, you could have a main ingredient for three cards!  You'll notice that I left an empty space on the top right corner of the front panel, and the next photo will show you why I did that:
It was a perfect place for a flower, but it also provides an excellent opportunity to add my own embellishment to give the card some dimension.  I used Stampin' Up!'s Blossom, 1-1/4" Scallop Circle, and 7/8" Scallop Circle punches to create the So Saffron flower with Chocolate Chip center.  When I needed a sympathy card yesterday, it was quite handy to just take one of my printed cards, dress it up, and write a short message.

Sunday, July 14, 2013

FEATHERS & BURLAP

I realize that this card is very Fallish, but I couldn't help myself.  On Friday, UPS delivered a box of goodies that I pre-ordered from Stampin' Up!'s holiday catalog, and I was itching to do something fun with the burlap ribbon (I want that stuff by the truckload).  Another product that I was really excited about was the Feathered Woodcuts Kit (digital download).  It's so easy to build a card around a couple of feathers, and they just look nice.  I decided to cut my feathers from Sweater Weather designer paper (another pre-ordered item), and that paper set the tone for the Fall design of this card.  To cut the feathers, I used My Digital Studio to select the feather that I wanted to use and then exported the SVG to use with my Silhouette Cameo software.  Once I opened the feather image with the Silhouette software, I copied it twice, flipped one of the images, and then cut the three feathers from the new designer paper.  So, so easy!!!!  Other Stampin' Up! products used to create this card include Very Vanilla card stock, Naturals button, Happy Day stamp set, and Pretty Print embossing folder. 

Saturday, July 13, 2013

EPIC DAY GIFT ENSEMBLE

Make this cool little mini album out of one sheet of Designer Paper!  The size makes it perfect to take with you in your hand bag to show off your favorite pictures or tuck special notes in.  The decorated gift bag is the perfect way to present this sweet little album as is the matching card.  
The tutorial for this pretty ensemble, which was designed by Monika Davis, is available at Craft Project Central

Friday, July 12, 2013

"FREESTYLE FRIDAYS"

Happy Friday!!!!  It's Julie's turn to share a Freestyle Fridays project today, and I can tell you that her project is a masculine birthday card that has texture and glimmer.
That's all she told me, so let's head over to her blog to read all about it.  I'm sure she'll have a mission for me, and you might want to give it a try, too!  They're sometimes quite challenging but always fun!

Thursday, July 11, 2013

SUMMER GARDEN PARTY AT CRAFT PROJECT CENTRAL

Hosting a party can be exciting and nerve-wracking all at once! Decor is a breeze with this simple, yet elegant ensemble from beginning to end with the party invitation, banner, centerpieces and guest favors! Delight your friends and family with a classic garden party this summer!
 This ensemble was designed by Tara, and her tutorial can be found at Craft Project Central

Wednesday, July 10, 2013

"QUATREFANCY" CIRCUS TENT CARD


It was time to change the blade on the Silhouette, and I thought that I should try it out afterwards . . . just to make sure everything was all good.  Okay, so maybe that part isn't exactly true.  I just wanted a reason to cut this cute circus tent card. 


The circus tent is actually a shaped gatefold card with a flag on top.  Stampin' Up! products used to create this card include "Quatrefancy" designer paper, retired Pool Party ribbon, and the image stamped on the flag is from the retired "Collage Curios" stamp set.  The image stamped on the inside is from the "Pennant Parade" stamp set.

Tuesday, July 9, 2013

HOMESPUN HELLO

I recently ordered Spellbinders' "Homespun" dies, which had caught my eye more than once.  Still, I wasn't sure that I'd find many uses for the dies and was hoping that I wouldn't regret the purchase.  When I made this card a few days ago, I still wasn't sure how I would use the die-cuts, but I had the colors all worked out.  Once I did a little sponging to the cuts and played around with placement, it didn't take long to figure out that my card needed something lacy, so I added the doily half and then the crochet trim, mainly because the card had to have some kind of ribbon (my rule).  I thought the embossed basket weaving on the So Saffron layer went nicely with this card's design.  The sentiment is from Stampin' Up!'s Happy Day stamp set, and all of the card stock is from Stampin' Up! . . . Pistachio Pudding, Whisper White, Soft Suede, Cherry Cobbler, and So Saffron.

"TAG A BAG" ORGANIZERS

The new Tag a Bag gift boxes are great for gifts and treats but are so versatile that you can use them for many other things!  For this project the gift boxes are turned into organizational boxes to organize your Baker’s Twine and/or Washi Tape!  This project is a great class project as well!  Everyone will want to fill their boxes with new Twines and Tapes!
 The tutorial for this project, designed by Niki, is available at Craft Project Central.

Monday, July 8, 2013

"MAKE-IT-SNAPPY-MONDAY" . . . AND THE WINNER IS . . .

While putting away some card stock, I found a die-cut pillow box in the Early Espresso file and thought it would be the perfect starting point for my MISM project.
I chose Crisp Cantaloupe and Coastal Cabana for my accent colors, which (by name alone) led me to By the Tide stamp set.  I needed a little something else, so I used two of the Tape It images stamped on Very Vanilla card stock and then cut out with scissors.  The scrapling (small card) has a sentiment from the Postage Collection stamp set, which was stamped onto Crumb Cake card stock and punched with the Petite Curly Label punch, and features a decorative edge created with the Dotted Scallop Ribbon Border punch.  It would be fun to surprise a co-worker on a Monday morning with a cute ensemble like this, especially if there was a little something sweet in the pillow box.  ;-)

Last Thursday, in THIS blog post, I promised to give a FREE one-month subscription.  I had three comments, and the winner is . . . (drum roll) . . . ELLEN, who wrote, "What a clever idea, Regina! I would love to win a free subscription to Jluy so I could make one of theses albums...or two or three. I'm thinking you used one of the new wood-mount cases for the cover?"  Congratulations, Ellen!  BTW, I did not use one of Stampin' Up!'s new stamp cases for the suitcase cover--I designed it using card stock.  ;-Ellen, please contact me at randari at hotmail dot com so that we can get your subscription set up.

Sunday, July 7, 2013

LUXURY CLUTCH PURSE

Yesterday, I received word of a fun way to receive a $6.99 gift card from svgcuts.com.  All I had to do was download the SVG file for this adorable purse, make a purse, and post a photo.  Since getting a Silhouette Cameo machine, I have enjoyed a few SVG files from svgcuts.com, so being able to download a free project--a really cute one--was all the invitation that I needed.  This purse was a breeze to assemble, and the only part that kind of stumped me was how I wanted it to close.  After a lot of thought, I finally decided to use a thin hook & loop tab, which works great!

Saturday, July 6, 2013

LET'S BE ADVENTURERS . . . CREATING PRETTY CARDS - SKETCH CHALLENGE 25

Each month, Craft Project Central has a brand new sketch challenge.  Do you know what's great about participating in the challenge?  YOU could win a FREE one-month subscription to the site and gain access to some of the best project tutorials!  To learn more about this awesome and easy opportunity, check it out HERE.  This is the project that I designed for Creating Pretty Cards - Sketch Challenge 25:
I began with a piece of Pistachio Pudding card stock, which I stamped with the large floral/decorative image from Happy Day stamp set.  I stamped the image using Pistachio Pudding, Perfect Plum, and Soft Suede ink.  I then stamped the Off the Grid image using Early Espresso ink and used the same color to sponge the edges of the card stock before giving it texture with the Honeycomb embossing folder.  A Q-tip was used to lightly apply some Silver Sparkle Dazzling Details to some of the embossed hexagon shapes, and the globe image from the Wanderlust stamp set was stamped in the bottom right corner.  Two other images from Wanderlust were stamped and cut out to create the tags on the Soft Suede strip of card stock, which features the Chevron embossing folder.  I wrapped a strip of Perfect Plum taffeta ribbon around the card stock layers.  On a small strip of ribbon, I tied knots in both ends, folded the ribbon in half, and adhered it to the other ribbon.  No matter what I did, the ribbon just didn't look right when I slipped the short piece under the already-adhered ribbon and tied it in a knot, and I thought this was a fun way to add a little something different to the card.  I thought it was interesting that I started out planning to only use Happy Day to create this card and, in the end, you can barely tell that I used that set.  All products used on this card are from Stampin' Up!, and I think the glimmer brad is the only product that I didn't already mention.  Now it's your turn to create something for Creating Pretty Cards - Sketch Challenge 25!

Friday, July 5, 2013

"FREESTYLE FRIDAYS" AND FAUX DIAMOND DUST

This photo captured the glitter.
Last week, Julie posted a Freestyle Fridays project featuring a heat-embossed technique that made her die-cut card stock look like a smooth, shiny piece of metal.  It was gorgeous!  Every other week, she issues a mission . . . something challenging for me to take into consideration when I prepare for the next Freestyle Fridays project.  My mission this week was to use embossing powder, a product that I hardly ever use.  Back in the day, when I was a new stamper, I enjoyed the magic of embossing powder and tried every technique that I could find that called for it.  I am reminded of Joseph's Coat--the one technique that I finally had to put on the "dead to me" list of failed attempts.  I should probably try it again, but it's okay to be beaten by one technique.  Oh, but there's also Jacob's Ladder.  What is it about Joseph and Jacob?  Those rascals!  About my card . . . I chose to revisit Faux Diamond Dust, and it's such a beautiful technique--super easy, but difficult to photograph.  On Very Vanilla card stock, I stamped the image using black permanent ink, and then used Q-tips to color the leaf and pear with Old Olive and Daffodil Delight ink.  The stamped image was die-cut with one of the Window Frames Framelits dies, covered the card stock with VersaMark ink, and then sprinkled with Iridescent Ice embossing powder, which was set with a heat tool.  I adhered the stamped image with Stampin' Dimensionals to an Old Olive die-cut layer, which was adhered with Stampin' Dimensionals to one of the Apothecary Accents die-cut labels.  I chose Summer Starfruit card stock for the card base, to which I adhered a torn piece of Modern Medley designer paper.  The sentiment is from Stampin' Up!'s Sassy Salutations stamp set, and the finishing touches of crochet trim, linen thread, and designer button are also from Stampin' Up!  Even though I might have frowned when I first read Julie's mission for me, I proved to myself once again that challenges are good because they might force us to do something that we think we won't like, but there's always something positive to take from challenges.  Pass or fail, they help us (or our "dead to me" list) grow.
See the sparkle?  It's quite sparkly in person but hard for the camera to pick up.
ETA:  I neglected to mention that the main focal point--the pear image--is from Stampin' Up!'s retired hostess set, Faith in Nature.