Blog Pages

Sunday, August 27, 2017

"GRACEFUL GARDEN" ENSEMBLE - AUGUST BONUS PROJECT

The project that I designed for Craft Project Central this month is featured today, and it is the August Bonus project!  DID YOU KNOW?  The bonus project can be obtained by subscribing to any of the three, six, or 12-month subscription packages that include the month that the bonus project is posted.  Following is the introduction that I wrote for my project:
 
Create a pocket full of pretty cards that feature fun Watercolor Pencil techniques.  One of the techniques featured in this tutorial demonstrates how to use one pencil to get the shading and coloring of two or three colors, but your favorite might be the “Cheater’s Reflection” technique.  It is so easy and lends such a nice focal point for any card!  Besides the fun pencil techniques, you’ll also learn how to make your own coordinating dimensional embellishments!  If you decide to make this lovely ensemble to give to someone special, you’ll appreciate that there’s a tutorial for a pretty and simple pocket holder for the four cards.
 
 
On September 2, I will give a FREE one-month Craft Project Central subscription to a lucky winner!  If you would like to get your name in the drawing for the FREE subscription, just click THIS LINK and leave a comment on my project.  The winning name will be drawn on September 2nd and announced on my blog.  Be sure to visit my blog again on the 13th to see if you're the winner. 


Friday, August 25, 2017

A CHALKY CHRISTMAS CREATION

One of the best things in my starter kit when I joined Chalk Couture was the Aiden chalkboard frame, and my plan was to decorate its chalkboard surface for Christmas.  Unfortunately, the transfers that I used (Small Christmas Tree and Retro Ornaments) are no longer available, BUT . . . brand new transfers (including holiday designs) are coming on September 1.


It took a while for me to work up the courage to work on this project (the size is 9" x 12") but, as I am learning, working with the Chalk Couture chalk paste is so very easy--and quick!  Best of all, if mistakes are made or if I change my mind, a cloth and a little water will wash the paste away.  I love that!

Have you taken a look at the Chalk Couture products?  

Tuesday, August 22, 2017

A CHALKY SCHOOL OF FISH FOR MY SISTER

After years of teaching Kindergarten, my sister will be teaching 1st grade this year.  I suppose that doesn't seem like much of a change but, to the teacher and the classroom, it is a change.  Normally, I would make a card for my sister to wish her a fantastic school year, but I was in the mood to play with Chalk Couture's transfers and paste and created this fun sign:


I recently won the You've Got This transfer from Chalk Couture and, at the time, I couldn't think of an occasion when I might use it, but it turned out to be perfect for this project.  What was even more perfect were the fun fish, bubble, and seaweed images from Under the Sea.  A school of fish is just what a teacher needs, right?  It's hard to tell from the photo, but I sprinkled glitter on the bubbles before the paste dried, and they're so sparkly in real life.  Speaking of paste, the colors featured on this sign are White, School Bus Yellow, Orchid, Thai Teal, Royal, and Evergreen.

If you haven't checked out the awesome and fun Chalk Couture products, please visit  my web site.  If I can answer any questions for you, just let me know.

SEASONS COASTERS

Stamped coasters are so simple and inexpensive to make! With the holiday season quickly approaching, it’s time to think about special people in your life you want to create a gift for.  In fact, these stamped coasters would make great gifts for anyone, any time of year!


The tutorial for these pretty coasters, which were designed by Jari Francis, can be found at Craft Project Central.

Monday, August 21, 2017

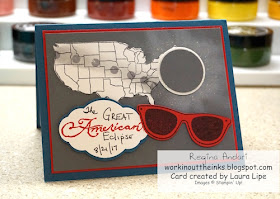
TOTALLY ADORABLE TOTAL ECLIPSE CARD FROM MY SWEET FRIEND, LAURA


I'm sure I've mentioned before that I love to open the mailbox and find a greeting card.  It doesn't happen too often but, when it does, I can hardly wait to get in the house to open the envelope.  It happened recently that I received a totally adorable card from my friend, Laura Lipe.  Laura and I met around 13 years ago at a North Carolina Stampin' Up! demo gathering and have been friends ever since.   She was a mentor when my Stampin' Up! upline resigned shortly after I became a demo, but she quickly became a treasured friend.  Laura is a very creative soul, and I have been waiting to share the card that she designed for the eclipse.  Feast your eyes upon it:


In true Laura fashion, she had a special design for the inside:


It's a great design, isn't it?  And, of course, a keepsake!  Thank you again, Laura!  Your creativity always dazzles me!

Thursday, August 17, 2017

UPCYCLE GIFT BOXES

You may throw away or recycle cereal, macaroni, or cracker boxes, but you can turn them into beautiful gift boxes for that next special occasion. See how to use Designer Series Paper and other stamping supplies to turn these plain boxes into gift wrap that is almost as impressive as the gift you are giving. You will learn how to wrap two different size boxes in your favorite patterned paper.


The tutorial for these festive packages, designed by Christine Miller, can be found at Craft Project Central.

Tuesday, August 15, 2017

"GARDEN IN BLOOM" FOR SKETCH CHALLENGE #74

In this blog post on August 3rd, I introduced Craft Project Central's Creating Pretty Cards - Sketch Challenge #74, which looks like this:


Today I created this card for the challenge:


My card features the following Stampin' Up! products:
Cardstock:  Whisper White, Basic Black, Gold Glimmer, Wild Wasabi
Stamp Set:  Garden in Bloom
Ink:  Rich Razzleberry, Basic Black Archival, Crushed Curry
Sizzix:  Eclectic Layers Thinlits Dies, Layered Leaves Embossing Folder

This month's sketch challenge was designed by Christy Fulk, and you can find her easy-to-follow tutorial HERE.  I hope that you will create a card for the challenge!  Did you know . . . For every ten cards submitted, Craft Project Central will pick one winner of a FREE one-month subscription!  The winner(s) will get to select the month of their choice!

Monday, August 14, 2017

ALWAYS BE A MERMAID

I had the house all to myself this morning and decided to finally see what I could do with Chalk Couture's Always Be A Mermaid transfer.  In case you don't know, the Chalk Transfers come in a variety of sizes and are similar to working with thin craft vinyl with adhesive.  The images/shapes are silkscreened, and the silkscreen helps keep the Chalk Paste from going under the transfer.  Having that fine screen (of sorts) also means that less paste is needed to transfer the image/shape.  Always Be A Mermaid is a really pretty transfer, one that I have been anxious to use, but it's also a large one.  This is what I created with it:
 
 
My project wasn't without a couple of mistakes but, overall, I think it turned out great!  Aren't those bubbles a perfect addition?  They are from the Under The Sea transfer.  I would have linked to that transfer, but it must be out of stock at the moment.  Whenever a product is out of stock, it gets removed from the web site.  The Chalkology Paste colors that I used are as follows:
Moss
Red
Orange
Red Orange
Thai Teal
School Bus Yellow
Charcoal Gray
Mint
Tiffany
White
Sand
 
I am really loving Chalk Couture's products!  Each time I open a jar of paste, I have the best time!  It's incredibly easy to use and, best of all, the product dries very quickly and cleans up EASILY!  The Chalk Transfers are re-useable, and they can be used with the paste on all types of surfaces besides chalkboards . . . walls, mirrors, windows, wood, metal, etc.  My mermaid project is on foam board!  Let me know if you would like more information about this new company and the FANTASTIC products they offer.

Saturday, August 12, 2017

TIME FOR A COFFEE BREAK

Do you know someone you don't get to see very often because they're so busy? With all the hustle-bustle going on in the world today, this Coffee Break set is the perfect gift to take to that person, and sit down with them for a chat. The k-cup holder is a cinch to put together - it could even stand on its own. But adding the other little coffee gift along with that matching card is sure to please and relax even the busiest friend. So, it's time to enjoy - it's "Time for a Coffee Break".


The tutorial for this ensemble, which was designed by Sandy Mott, can be found at Craft Project Central.

Thursday, August 10, 2017

RAMBAM THE PANTHERS FAN

This is just too cute not to share unless, of course, you don't see cuteness in a sweet Border Collie.  I can't believe I just typed something that nonsensical--our little RamBam is adorable with or without his Panthers jersey!  He is pictured below sporting his football season attire, waiting with my son for the first pre-game to begin:


Chad has taught him a really cute "touchdown" command that I hope to see very, very often this season. 
 

Tuesday, August 8, 2017

TWO (THREE, ACTUALLY) NEW CHALK COUTURE PROJECTS

I was recently asked if Chalk Couture's Chalkology Paste could be used on surfaces besides chalkboards, and the answer is YES!  As a matter of fact, the paste can be used on many surfaces--probably as many as you might use with ink or paint.  On the card below, I used the Tiffany paste in the simplest manner imaginable!  From scrap cardstock, I used Stampin' Up!'s Daisy punch to create a stencil (of sorts), which I placed on top of the Tangerine Tango cardstock and held in place while I applied the Chalkology Paste over the punched shape.  I then punched another daisy from Island Indigo cardstock to adhere on top.  The paste dried so fast that I was able to adhere the darker daisy in the time it took to pick up the cardstock and punch it!


One of the two projects that I intended to share today is this gift bag.  I used the beautiful and bright Orchid Chalkology Paste and the Bee Humble & Kind Chalk Transfer (I think this is my favorite) to quickly decorate the bag.  I used Stampin' Up!'s Pretty Label punch to create the gold tag, which was decorated with a crown using the same Orchid paste.


And the second project, using the same Chalk Transfer, is this adorable canvas bag:


So there you have it . . . three ridiculously quick and easy projects created with one Chalk Transfer and four colors of Chalkology Paste.  I have enjoyed paper crafts and mixed media for more than a decade, and I fell head over heels in love with the Chalk Couture products, which add yet another dimension to a craft that I already enjoy.

Are you interested in Chalk Couture?  Feel free to visit (like and follow) my Facebook page!


Monday, August 7, 2017

NATURALLY ECLECTIC CARD BOX SET

When you need a gift in a hurry, you’ll be able to whip up these cards using the gorgeous Naturally Eclectic Designer Series Paper. Who wouldn’t love a set of four handmade cards and envelopes in a cute box made with the Envelope Punch Board?!  Make up several sets and you’ll always have a gift handy for a special occasion.


The tutorial for this creative set of card, designed by Beth McCullough, can be found at Craft Project Central.

Thursday, August 3, 2017

CREATING PRETTY CARDS - SKETCH CHALLENGE #74

Each month in addition to the great 3D projects that Craft Project Central has for you, they also host a monthly card challenge – Creating Pretty Cards!! This month's sketch (#74) looks like this:
 

To help you recreate the sketch each month, they also provide a free Sketch Mini Tutorial! This mini tutorial has information about how the inspiration card (using the sketch) was created, supplies used, and basic measurements!!  Below is a picture of the card that the designer, Christy Fulk, created for the sketch challenge:
 

DID YOU KNOW?  For every ten cards submitted, Craft Project Central will pick one winner of a FREE one month subscription! The winner(s) will get to select the month of their choice! Head over to Craft Project Central to learn more and submit your creation!!

Wednesday, August 2, 2017

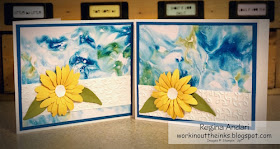
CARDS FEATURING SHAVING CREAM TECHNIQUE

Last week, my guys (and the pup) were away from home (all night), and my mind was so busy with a long list of "what to do's"!  Now that Stampin' Up! has brought back Glossy Cardstock, I decided to play with ink and shaving cream--something I haven't done in years!  The only thing I needed was shaving cream, so I made a quick trip to Walmart for that.  The ink colors that I swirled into the shaving cream were Pacific Point and Old Olive.


I kept the cards really simple and let the pretty background get all the glory. Other Stampin' Up! products featured include Whisper White, Pacific Point, Old Olive, and Daffodil Delight cardstock and the Garden Trellis embossing folder.  The shaving cream and ink make beautiful backgrounds, but I think my favorite thing about this technique is the nice, clean scent that lingers in the room.

Tuesday, August 1, 2017

LEMON ZEST ENSEMBLE

Add some sunshine to someone’s life with a little lemony treat! In this tutorial, you will create your own lemon pattern cardstock to make a bright birthday card, a lemon candy treat in a popcorn box, and a card with a lemon tea bag tucked in a pocket. You will also make a mini treat bag with a sliding insert that reveals a lemon herbal tea bag. You can’t help but smile while making these bright and cheery projects.  
 
 
Isn't this an adorable ensemble?!?!  It was designed by Cindy Brumbaugh, and the tutorial can be found at Craft Project Central.