Blog Pages

Tuesday, May 27, 2025

"FLORAL IMPRESSIONS" FAN CARD


Sunflowers and "Floral Impressions" designer paper make it easy for this card to deliver sunshine, don't you think?  The sentiments that I chose for this card are "Good Feelings" and "Hope You Know" (both retired, sadly), but they were just too perfect.


While the inside of the card has an angled piece of white cardstock, the angles were enhanced by the designer paper strip on the right side, which is behind the white cardstock, the floral designer paper at the bottom of the white layer, and the piece of dotted ribbon.  Did you notice the sequins?


Pictured above are the clear sequins.


In the photos above and below, you can better see the green sequins.  They didn't begin as green sequins, though.  They were actually clear, but I didn't like how prominent they were on the green designer paper after I had placed them.  The more I looked at them, the less I liked them.  And then it occurred to me that I could color them with a green alcohol marker.  They turned out great, huh?


This was my first fan card, and I don't know that I will make any (or many) more.  I'm not even sure this one turned out correct, but I felt that I was slicing too much designer paper and cardstock for one little card.  And that's another thing . . . this isn't a little card--it's 5x7.  It's kind of nice to have a larger card but, as someone who is used to making A2 cards, it just seems like a cardstock/paper hog.


All things considered . . . I think it turned out quite pretty, and that makes it a winner!


Have a stampin' good day!
 

Sunday, May 18, 2025

DRAWSTRING BOX-BOTTOM BAGS FOR MOTHER'S DAY


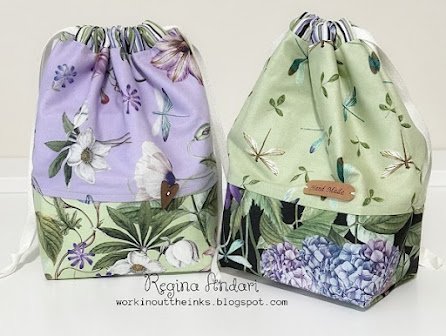
Today's post is not about stamping or paper crafts.  I want to share the box-bottom bags that I made for my mother and sister for Mother's Day.  While I enjoy sewing and will tackle a reasonable challenge, what concerned me the most about making these bags was the drawstring.  I've never had to insert a drawstring in a project before, but I ordered a little doohickey from Amazon that made the task oh so quick and easy.  I can remember my mother using a safety pin, but I was afraid I'd mess that up and get the pin stuck halfway through.  Below is a photo of the bags without the drawstring (while I was waiting for the tool to arrive):


Since the widest measurement was 10" for the cut pieces to create a bag, this was a perfect project for a Layer Cake.  The one I used is Fleurs Tiles by Northcott.  The prints are just so pretty!  


I sewed a heart-shaped button to the front of my mother's bag, and a "handmade" leather tag to the front of my sister's bag since she doesn't like hearts.  I don't understand that.


The instructions that I used didn't call for a lining, and I didn't put one in the first bag that I made--the trial--but I lined the bags that I made for my mother and sister.  And guess what?  This project even has a pocket inside--actually, there are three little pockets!


Isn't this such a cool little project?  I was so anxious for my mother and sister to get their gifts, but I had to wait a whole week since I didn't get to see them on Mother's Day.  

I'll get back to sharing paper crafts soon! 

Tuesday, May 13, 2025

SIMPLE "FLORALS IN BLOOM" NOTE CARDS


The three cards that I'm sharing today--all made exactly alike--were created with just one sheet of "Florals in Bloom" designer paper.  I didn't even use the whole piece of paper--there's plenty left to decorate the flaps of three envelopes.


All three cards are 4.25" square and feature Blackberry Bliss layers, silver trim, and shiny pink sequins.


The center square layers were embossed with the Coastal Weave (retired) embossing folder, which you can see a bit better in the photo below.


Aren't the flowers so very pretty?  This paper collection is simply gorgeous and, as you can see, quite easily makes beautiful note cards.

Saturday, May 10, 2025

"FLORALS IN BLOOM" MOTHER'S DAY GIFT


I had to work today and, since it's Mother's Day weekend, I wanted to take a little something for my "bestie".  I've only got three pictures to share of the adorable little box and the way the envelope was decorated--both featuring Stampin' Up!'s gorgeous "Florals in Bloom" designer paper and pink gems.  Below is a better picture:


It's such a feminine ensemble, right?  I can't even find the best words to describe how pretty this designer paper collection really is.


Of course, the envelope flap had to be decorated, too.  And just look at those pretty gems on the box! 

I haven't processed the photos of this year's Mother's Day cards, so I'll share them in a separate post.  

Happy Mother's Day to you (if appropriate) and to all the mothers who are special to you.

Wednesday, May 7, 2025

SIMPLE (ROUGH CUT) CIRCLE FLOWERS


Sharing a really simple card today.  I found this gatefold card base in the file with my cardstock and decided to put it to use.  It wasn't actually meant to be a gatefold card.  Last Fall, I taught a paper crafts class at the club where I work, and the white card base was left over from a slide-up gift card project.  Moving right along . . . some time ago, I saw a card similar to the one I'm sharing today and loved how colorful it was and its truly simple design.  Scissors were used to cut the flower layers and leaves, and I used a paper trimmer to cut the stems.  


The colors really pop, don't they?  My cardstock colors are Garden Green, Daffodil Delight, Lemon Lolly, Pool Party, Coastal Cabana, Poppy Parade, and Calypso Coral.  The sentiment is from "Go To Greetings" (Stampin' Up!, retired).


In the above photo, you can see how pretty Stampin' Up!'s brand new Holographic Resin Dots are but, of course, they're much prettier in person.

Whenever your scrap cardstock is piling up, this might be a good way to use some of it.  :-)


Sunday, May 4, 2025

"ZANY ZOO" BIRTHDAY CARD (AND A CUTE PHOTO BOMBER)


Today is my nephew's 30th birthday!  I'll admit that the card I made for him might look a bit juvenile with the (not black and gray) raccoon holding balloons, but I thought the image was cute, festive, and one that adds a pop of color.  Why is the raccoon not black and gray?  Well . . . coloring with black ink is scary--especially on a small image where a very dark color can all of a sudden become way too much of a very dark color.


I wanted to make sure this little guy looked as cute as the balloons he's holding.  Even though this card was made for a 30-year-old man, it still needed some coordinating sparkly gems.  Can you spy the lighter green gems that are beside some of the die-cut letters on the darker green paper?  I was hoping they wouldn't blend in as much as they did--they're scattered between the die-cut letters on the dark green paper.  


A coordinating pocket was adhered to the inside of the card to hold a nice little check.  Isn't that what every 30-year-old nephew wants for his birthday?


While I was trying to take photos of the card, my sweet little Jack photo bombed--and totally stole the focus!  But look at his adorable little face.  Who could be mad at that?  


Happy birthday, Bryson!!!