Saturday, February 1, 2014

MAILBOX & GREETING CARD

Make this treat box resembling a mailbox for your sweetheart.  Fill it with some yummy treats and special notes.  This little mailbox will look great on any desk.
This lovely project was designed by Monika Davis, and her tutorial can be found at Craft Project Central.

Wednesday, January 29, 2014

JEWELRY BOX & NECKLACE SET

Valentines is around the corner and here’s a perfect little gift for someone you love!  This project includes a jewelry box and hand stamped necklace.  This project is a great gift project for other special occasions as well and makes for a fun class or camp project!
The tutorial for this BONUS project, which was designed by Jen, can be found at Craft Project Central.  Qualifying for the bonus tutorial is easy . . . just subscribe to two or more months in a row, put the Craft Project Central badge on your blog, or refer a friend to the site.  When your friend subscribes, just let us know!

Tuesday, January 28, 2014

TRIANGLE TREATS TIMES SIX

Over the weekend, I enjoyed creating with the Silhouette and came up with this cute package of six triangle boxes, which were connected with washi tape and then wrapped with a designer paper band.  I cut the large peony flower pieces, assembled them with a glimmer brad, and then adhered the dimensional flower to the band.  As you can tell from the photo below, each of the triangle boxes opens at the top so that gifts/treats are easy to retrieve.
The designer paper (International Bazaar, retired) and the glimmer brad are from Stampin' Up!

Monday, January 27, 2014

"MAKE-IT-SNAPPY-MONDAY"

Yesterday I needed to make a birthday card to send to a special cousin and, since I've been playing with the Silhouette lately, I decided to try this detailed house-shaped card which was designed by Samantha Walker.  I only made a couple of subtle changes to the original design, the first of which was the placement of flowers and the grass detail at the bottom of the card.  My card stock got pretty butchered when cutting the grass and flower stems, so I used Stampin' Up!'s Fringe Scissors to create my own grass.  The second change that I made to the design was to cut an extra house and chimney shape to adhere behind the front of the card.  I wanted the front door to be open, but I didn't think the card would look nice if my stamping and written message were visible.  I used silver Diamond Dots for the bird's eye and in the center of the flowers, and I used one of Stampin' Up!'s Candy Dots for the door knob.  I had a lot of fun with this card, and I love that it's so colorful and fits in a standard A2 envelope.  I think my cousin will like it!

Sunday, January 26, 2014

SWEET SORBET CARD & BOX SET

This lovely envelope style box, complete with a pretty flower on the front, contains five different card designs with matching envelopes.  This project features the new Sweet Sorbet designer paper and Banners Framelits dies.
I love the colors in that paper collection, and Amanda has designed such a pretty project with it!  Her tutorial can be found at Craft Project Central, and you'll want to make several of these sets!

Thursday, January 23, 2014

"POLKA DOT PIECES" GET WELL ENSEMBLE

It's that time of year when so many come down with a case of the "sniffles", and this little gift is sure to put a smile on their face!  This ensemble includes a darling tissue holder, a hand sanitizer holder, and a coordinating card and envelope to make your gift complete.
The tutorial for this project, which was designed by Laurie, can be found at Craft Project Central.

Wednesday, January 22, 2014

A CHAIR AND SOME STITCHES

My stamping mojo is slowly returning since the holidays.  Sometimes I come in here with the desire to stamp, but I look around the room and can't think of anything that I want to make.  Over the weekend, I set out to make a card for mamaw.  It seems that I have slowed down on sending cards to her, although not intentionally.  I visit once a week--not the same day each week--which makes it difficult to find the right day to put a card in the mail so that she'll receive it between visits.  My sewing machine was still on the table, ready to use, so I knew that my card for mamaw would have some sewing.  This is what the front of the card looked like . . . very, very simple in design:
But the inside had a neat 3D paper-pieced pop-up chair in a pretend living room, complete with a neat embossed rug and an outdoor scene visible from the window.
The sentiment (which happened to be so perfect) was attached to the chair with a vintage brad.
I wasn't sure where to place a written message, but I ended up writing it on card stock and slipping it under the chair to ride along in the card.  I think mamaw will enjoy this card a lot, and what are you willing to bet that it will show up in her mailbox today . . . while I'm there?

Tuesday, January 21, 2014

STATIONERY BOX & CARD

Get organized with this lovely stationery box that can hold many A2 greeting cards and envelopes.  The drawer is the perfect place to store a pen or two and some stamps to make sending greetings easier by having everything you need all in one pretty package.  This project comes with a matching card so you can give some pretty organization as a gift!
This gorgeous ensemble was designed by Amanda, and her tutorial can be found at Craft Project Central.  That box is amazing!

Monday, January 20, 2014

"MAKE-IT-SNAPPY-MONDAY"

I haven't sent a card to aunt Betty lately and, quite frankly, had a hard time deciding what kind of card I wanted to send.  The problem is that there are (perhaps) too many choices, but I chose to use Cricut's Create a Critter cartridge and Cricut Craft Room (CCR) to design this shaped hedgehog card.  She's a cute one, huh?  I haven't used CCR very much and had to learn a few things as I was working on this card.  I enjoy each of my die-cut machines, but I still love how easy it is to use Cricut images to create layered and shaped cards.  After getting the layers assembled, I added some Stickles to the cut-out "spiny" sections, and a Diamond Dot sticker was placed on the bow.  The sentiment, from Stampin' Up!'s Happy Watercolor stamp set, is a new favorite of mine.  I don't know that aunt Betty has a special fondness for hedgehogs, but I hope this card will make her smile and feel loved.

Sunday, January 19, 2014

VALENTINE'S DAY TRIO

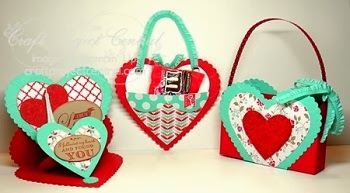
It's time to get ready for Valentine's Day!  These projects would be a great way to show your special Valentine that you care.  Give them a little candy treat in the heart pouch, put a little gift into the Valentine gift bag, and let them know you love them by giving them a special double-easel Valentine card.
This adorable ensemble was designed by Christy Fulk, and her tutorial can be found at Craft Project Central.  I can hardly wait to make a card like Christy's!!