Wednesday, December 30, 2015

BABY'S FIRST YEAR MINI SCRAPBOOK & CARD

If you've got a new baby in the family, or a friend has had a baby, then you really should make this mini scrapbook for them. This mini scrapbook is a great little keepsake for the baby's first year. There is room for a picture of the baby for each of its first twelve months, along with two pockets to put little keepsakes in. This scrapbook shows a new way to use the Project Life Baby Girl Card Collection and Hello Baby Accessory Pack. It also features the Hello Baby Stamp Set. It can be customized for a baby boy by using the Project Life Baby Boy Card Collection instead. This would also make a great Project Life Class.

This ensemble, which was designed by Christy Fulk, is the December bonus project at Craft Project Central.  Qualifying for the bonus tutorial is easy . . . just subscribe to two or more months in a row, put the Craft Project Central badge on your blog, or refer a friend to the site.  When your friend subscribes, just let us know!


Monday, December 28, 2015

CAROLINA PANTHERS BANNER

Two of my Christmas presents that will get a lot of use are tabletop quilt stands.  My husband and son gave me one that will hold a 6" x 9" applique project, and my parents gave me a larger one that will hold a 12" x 14" banner/wall hanging.  I had a small (unfinished) piece for the smaller stand but was anxious to make something for the larger one.  Last Friday night, I was thinking about the Sunday game (Panthers vs. Falcons), and I decided that we needed a Panthers banner.  I whipped up this banner on Saturday and, sadly, our Panthers lost their first game of the season.  What????  I wasn't sure if the banner was a jinx, but I took it off of the stand halfway through the game hoping things would take a turn for the better, and now I'm afraid my guys won't allow the banner in sight during games. 
I knew my banner would need a panther and a football, and I knew the football would be an easy graphic.  The panther . . . not so easy.  I don't have an artistic bone in my body, but the process seemed much easier once I decided to stitch the blue and white shapes to a black background instead of having to cut the black shapes, too.  I've not worked with as many small/thin pieces of wool before and, even though the panther isn't spot-on perfect and my stitching could have been better, I am very pleased with how this banner turned out.  In case you can't tell what the gray thing is, it's my version of the NC state outline with an asterisk by Charlotte (I hope). 


SEWN BOX & CARDS GIFT SET

Do you love to sew and to do paper crafts?  If so, then this is the project for you!  In this project you’ll sew a gift box and some great cards to go in it!  Give the set as a gift (tag instructions included too!), to a crafty friend who will appreciate the time and creativity that you’ve put into this fun gift!

What a cute project this is, and I am anxious to try the tutorial!  This project was designed by Michelle, and you can find her tutorial at Craft Project Central.  Have you subscribed yet?

Saturday, December 26, 2015

SNOW DAY FUN

It’s 10 a.m. on a snow day. The snow is piling up outside and doesn’t look like it’s going to stop, and then you hear those three dreaded words – “Mom, I’m bored.” Keep your children entertained with this Snow Day Fun set. Use the Stampin’ Up! Snow Place bundle to create mix and match elements that will cling to the scenic background board. It’s simple enough for older children to create for younger siblings or neighbors, and smaller children will enjoy mixing the pieces to create cute snow scenes. Best of all, it’s durable enough to stand up to hours of use by tiny fingers. If you don’t have children, you can create this project for a friend who does and make a young child’s day. Instructions for a storage/gift box and a coordinating card are included. This would make a fun class for moms so they’ll be ready for that first snow day!

The colors of this project, which was designed by Buffy Cooper, are so pleasing!  You can find the tutorial at Craft Project Central--complete with step-by-step instructions and photos!

Tuesday, December 22, 2015

NO BONES ABOUT IT . . . QUICK & EASY CARDS & PACKAGING

This project includes two cards and two gift packaging ideas that are quick and easy…and no bones about it…they’re super cute, too!  The No Bones About It Stamp Set is featured and provides the dinosaur theme for each project…and Schoolhouse Designer Series Paper provides fresh, fun colors and patterns.  Those colors and patterns also bring the versatility that allows you to create for either the special little boy or girl in your life!  For a final finishing touch the matching envelopes are a cinch using the Envelope Punch Board.

The tutorial for this clever project, which was designed by Sue, can be found at Craft Project Central.

Monday, December 21, 2015

"MAKE-IT-SNAPPY-MONDAY" . . . AND THE WINNER OF THE CRAFT PROJECT CENTRAL SUBSCRIPTION

One of the good things about having a FREE one-month Craft Project Central subscription to give away today . . . a Monday . . . is that it was the perfect time to share a Make-It-Snappy-Monday project!  Lately, I have been a slacker about sharing MISM projects and, for that, I apologize!  As I mentioned in a recent post, I haven't been creating many projects lately.  There's a remedy for that!When I recently received my preorder from Stampin' Up!'s Occasions catalog, I was anxious to work with some of the new products and chose the gorgeous Birthday Blooms stamp set.  I liked it so much that I made a small set of cards in assorted colors to give to my mother.  Win-win!
Isn't that a pretty image?  It's a dream to color, and I love the size of the image!  I used an Aqua Painter with Tangelo Twist and Always Artichoke ink pads to color the flowers and leaves and then brushed the image with the Wink of Stella Clear Glitter Brush.  The sentiment (as well as the outline/border) is from the Rose Wonder stamp set, and I used the coordinating Rose Garden Thinlits die to cut the sentiment.  Other Stampin' Up! products featured are Tangelo Twist and Thick Whisper White Cardstock, Basic Black Archival ink pad, and Timeless Elegance DSP.
WINNER! WINNER! WINNER!
Many thanks to those who took the time to leave a comment HERE on the project that I designed for Craft Project Central this month!!  Random.org was used to choose the winner of the FREE one-month subscription, and the winner is #5--ROSIE HOWELL.  Rosie, if you'll contact me at randari at Hotmail dot com, we'll get your FREE subscription started!


Saturday, December 19, 2015

A WOOLY GIFT FOR MY PARENTS

One of my new passions this year has been the discovery of wool appliqué, and this is a fun piece that I completed as a Christmas gift for my parents.  The design (from Bonnie Sullivan's "Seven Snowmen") is so adorable!  While this pattern with so many little pieces was quite a challenge (for me), I did little else for the better part of two days besides prep the pattern cuts, choose the wool for each piece, and stitch, stitch, stitch.  It's true that my stitches may not be perfect, but I am very pleased with this piece because . . . well . . . it's cute as can be.  See that big snowflake that Mr. Snowman is holding?  It was a clever cover-up because I could never get his "hands" just right and after I stitched the snowflake into place with Stampin' Up!'s Silver Metallic Thread, I kind of made a mess in the center, which I covered with a pretty bow from silver cording trim.  ;-)  This is one of the awesome things about wool appliqué . . . it's forgiving of minor imperfections.  I'm still not sure if it's "wrong" for a snowman to be holding a snowflake--would it be right for a man to be holding skin?--but it is what it is.  Ha!

HANDBAG CARD SET

Everyone needs some pretty colors and flowers to get them through the cold winters, and this card set would definitely cheer them up! The cards are stored in a cute little handbag with pretty Antique Brads on the handles. The handbag can hold eight cards and envelopes. This tutorial includes two card designs made with the Remarkable You Stamp Set, and four of each design can be made to fill up the handbag. This would make a perfect gift, and a great class project. 

The tutorial for this project, which was designed by the talented Christy Fulk, can be found at Craft Project Central.

Thursday, December 17, 2015

SWINGING CARDINAL CHRISTMAS CARD

I've been a bit slack lately when it comes to posting new projects, and that's partly because I have been working on some Christmas gifts and also because I've been trying to learn to use a new camera.  Just yesterday, I took what would have been pretty good pictures, but I didn't have the card in the camera (argh!!!!) and didn't want to figure out how to connect the camera to the computer.  I do, however, have something to share today.  While the Silhouette Design Store had a 50% off sale, I purchased a lot of images/cut files, including this lovely dimensional card.  It's comprised of three layers (they cut like a dream) that are supposed to be attached with adhesive foam.  While the card definitely looks amazing when assembled with all of that dimension, I discovered that it looks quite striking without it.  
I brushed the cut snowflakes and the tops of the snowy ground layers with a Wink of Stella Clear Glitter Brush.  A brush of glitter instantly adds a little wow, you know?  I almost need a truckload of those glitter brushes because I want to use them on nearly everything--they're THAT awesome!  They don't disturb or muddy a watercolored image, are fast-drying, and the glimmery glitterness does not come off.  If you ask me, I think the Wink of Stella Clear Glitter Brush is one of the BEST products ever on the paper-crafting scene.  You can even purchase your own truckload of them from me once Stampin' Up!'s Occasions catalog goes live on January 5th, and I do recommend that you treat yourself to at least more than one.
 
WANT A SWINGING CARDINAL CARD?
I made more of these cards than I need and have 3 extras.  Sooooooo . . . the first three people who place an online order through my Stampin' Up! web site (click HERE) will receive one of these cards in the mail.  The inside of each card has a stamped greeting from the Flurry of Wishes stamp set, "Sending you a flurry of warm Christmas wishes".


Wednesday, December 16, 2015

WATERCOLORED MASCULINE GIFT CARD SET

Have you ever wanted to try your hand at watercoloring but thought you couldn’t do it?  Here is your chance to give it a try using the masculine set The Wilderness Awaits and an Aqua Painter. The step-by-step instructions will show you how to make a wonderful set of four masculine cards with envelopes that fit right in the box that showcases your water colored creations that you can give away as a gift or keep for yourself.

The tutorial for this great project, which was designed by Sara Hoogendoorn, can be found at Craft Project Central.  Sara is a guest designer this month.

Sunday, December 13, 2015

GO WILD AND PAMPER YOURSELF

This gift set is a mini spa day packaged in a coordinated kit. This set includes a nail file holder, a nail polish caddy, and chocolates that all fit inside a unique gift bag. There is also a matching gift card holder to add a little something extra. This spa day kit is perfect for that special person who deserves an indulgent gift. There is also a bonus recipe for a sugar scrub to add as an optional gift!

The tutorial for this project, which was designed by Boni, can be found at Craft Project Central.  Have you subscribed yet to this month's awesome projects and tutorials?

Thursday, December 10, 2015

"ENGLISH GARDEN" BOX & CARDS

Today I'm happy to share a sneak peek photo of the project that I designed for Craft Project Central this month.  It's a decorative box filled with six different card pockets to hold an assortment of greeting cards that feature the same floral/honeycomb/bee design that decorates the box.  Following is the introduction that I wrote for my project:
Need a fantastic, useful, and attractive gift for someone special?  You will enjoy making this project, and the recipient will cherish it!  Create six pockets to hold an assortment of cards, a box to hold the pockets, and this tutorial also includes instructions for six assorted—coordinating—greeting cards to start filling the pockets.  Once you give this box of cards to a special someone, don’t forget to replenish the cards throughout the year on holidays, special occasions, or just because.  This ensemble would be great for a stamp camp.
 
Would you like to win a FREE one-month subscription to all of the fabulous project tutorials at Craft Project Central?  Getting entered in the drawing is really easy . . . just visit Craft Project Central and leave a comment on the post where my project is featured by clicking HERE.  A winning name will be drawn and announced on Monday, December 21st, so be sure to visit my blog again on that date.

Monday, December 7, 2015

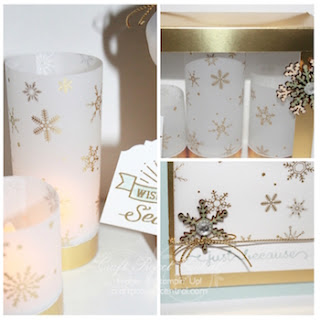
EVERLASTING LUMINARY GIFT SET

This sweet and sparkly little gift set is sure to please! Learn how to quickly, and elegantly, turn a battery-operated tea light into an everlasting décor piece. Then you’ll learn how to make the coordinating gift box that is the perfect custom size to fit the three tea lights. And the simple, but sweet card will make this the perfect hostess gift for those holiday drop-ins!


The tutorial for this gorgeous ensemble, which was designed by Julie Beltramo, can be found at Craft Project Central.

Sunday, December 6, 2015

SKETCH CHALLENGE #54

It's been a while since I have shared one of my own creations, and today I'm sharing the card that I created for Craft Project Central's Creating Pretty Cards - Sketch Challenge #54.  This is what the sketch looks like:


And this is the card that I created for the sketch:

Did you know that for every 10 cards submitted for the sketch challenge, a name will be drawn to determine which participant will receive a FREE one-month subscription to Craft Project Central? It would be awesome if you would take a few minutes to create a card to submit!  Just post a picture of your card online, and then upload/post the link HERE.

Stampin' Up! products featured on my card include:
Stamp Set:  Butterfly Basics
Ink:  Mossy Meadow, Blackberry Bliss
Cardstock/Paper:  Whisper White, Blackberry Bliss, Mossy Meadow, Gold Glimmer Paper, Winter Wonderland Designer Vellum Stack
Punches:  3/4" Circle, 1" Circle, 1-3/4" Circle
Sizzix:  Butterflies Thinlits, Greetings Thinlits


Friday, December 4, 2015

WINTER HOLIDAY PUNCH ART TAG SET

Punch art is a fun way to create images that you may not have stamps for, as well a great way to get extra mileage out of your punches. In this project we will create punch art images for Christmas, Hanukkah, Kwanzaa, and New Year’s Eve. Each of these images is part of a cute tag, and all of the tags fit nicely in a decorative box. Includes a matching card for gift giving. These fun punch art designs are great for a club or a class, or just a fun winter afternoon of crafting.

Many of us are preparing for Christmas and in need of clever tags, such as these designed by Yapha.  Her complete tutorial can be found at Craft Project Central.  Have you subscribed to the awesome tutorials this month?  Consider giving a subscription as a Christmas gift to your stamping and paper-crafting friends!

Tuesday, December 1, 2015

2016 CALENDAR / KEEPSAKE BOOK GIFT SET

Are you looking for a thoughtful gift for a special person this Christmas or for an upcoming birthday? This 2016 Calendar/ Keepsake Book Gift Set is a wonderful choice! This calendar will not only look beautiful sitting on a desk or counter, it will also turn into a keepsake book at the end of the year. There is space to write down goals for the New Year, record special memories and each month has a place for a treasured photo. The calendar and custom pen fit nicely inside the gorgeous gift box that doubles as storage when the year is done. And don’t forget to add the matching card! This lovely card is the perfect way to let your recipient know that you are thinking of them.

The tutorial for this great project, which was designed by Julie, can be found at Craft Project Central.