Friday, January 27, 2023

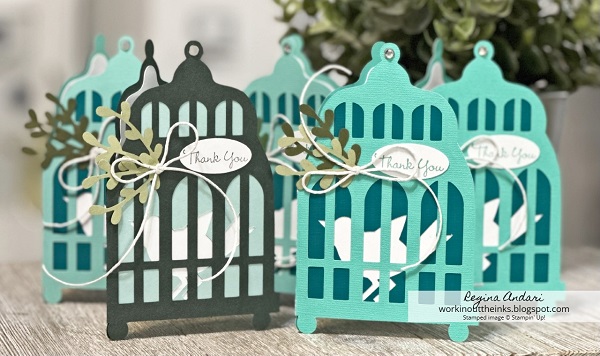
BIRDCAGE THANK YOU


I was fortunate to receive a few generous Christmas gifts at work last month, and that gave me the opportunity to make cards.  Some of my thank you cards were Christmas designs but, since some of the gifts were received after the holiday, I designed these birdcage cards to send.

I think I mentioned that my guys gave me a Cricut Maker machine for Christmas, so designing these cards was the perfect excuse opportunity to play work with my new machine.  


The stamped "thank you" is from Stampin' Up!'s "Go To Greetings" stamp set, and two retired Stampin' Up! punches are featured on this card . . . the oval and the sprigs.  


I doubt that I will ever tire of designing shaped cards--they are truly my jam!  These little birdcage designs turned out cute, don't you think?


Thursday, January 5, 2023

"WATERFRONT" BIRTHDAY CARD


I've said it before, and I'll say it again . . . masculine cards are some of the most challenging to make.  I sometimes dread the process because it means that I have to reach for something other than flowers.  While looking at my many choices, Stampin' Up!'s retired "Waterfront" stamp set seemed perfect for the task.


Didn't the images create a pretty scene?  Best of all, making this card was sooooooo easy and quite fun.  I liked the wonky placement of layers and, of course, all of the distressed edges.  They lend so much texture to the overall design.  The punched leafy branch ("Bough" punch) seemed to be an appropriate embellishment, along with the linen thread--even though it was tied in a bow.  BTW, if you like to add just a little something simple to your cards (especially those with a floral and/or nature-ish design), I can't recommend the "Bough" punch strongly enough.  When I first laid eyes on this punch, I knew that I must own it and have had ZERO regrets!  It's definitely a keeper! 

It's hard to tell from the photos, but I used the Wink of Stella on the "water" so it would have a bit of shimmer.  Was that necessary for a masculine card?  Probably not, but water needs to shimmer.

I wish I had taken a better photo of the envelope, but it was also stamped with some of the same images and colors that I used on the card.

This card and envelope turned out quite nice, huh?

Thursday, December 29, 2022

SNOWFLAKE GATEFOLD CARD


My most favorite EVER Paper Pumpkin kit from Stampin' Up! has been the "Simply Snowflake" kit from November 2014 (see the projects HERE).  I liked it so much that I bought a refill--probably more than one since I still have one on hand.  A few years ago, I was fortunate that Shannon Allen designed a Cricut cut file for a similar card, and I have enjoyed making a few of these through the years--almost always make a few to send each year at Christmas.  


It's a great card, isn't it?!?!  I fall in love with the design every time I make one of these cards.  Of course, there are so many other card designs that are over-the-top and/or really special in a multitude of ways, but my love for this one seems to grow and grow.  


Above is a closer view of the interior.  Some of the sentiment layers had stamped snowflakes, others did not.  All of the cards that I made this year (and in years past) were tied closed with silver trim, and I think that probably makes the card even more fun to receive.


Sunday, December 25, 2022

"TREES FOR SALE" CHRISTMAS CARD


Of all the Christmas cards that I made this year, I made the most of this design.  I don't know why, though, because this one had the most pieces to assemble.  It took the better part of FOUR DAYS to do all of the cutting, assembly, and foiling.  BTW, the foiled sentiments were created with Spellbinders "Mini Christmas Sentiment Strips" hot foil plate, Silver foil, and my Go Press & Foil machine.  All of the other images are from Stampin' Up!'s "Trees for Sale" bundle.  Cardstock colors are Mossy Meadow, Old Olive, Cherry Cobbler, Pool Party, and White.  Vellum cardstock was used behind the die-cut camper for the windows.


The card folded on the left side and, as you can tell, I used a distressing tool on the strip of white cardstock behind the sentiment.

From the above photo, you can get a tiny glimpse of the greenery that was stamped inside the card.  It wouldn't be right to have all that fun on the front and a boring interior!  The foiled background paper is "Silver & Gold 6x6 Specialty Paper" from Stampin' Up!, and I'm fairly certain that it's retired.  

These cards may have been a lot of trouble, but I loved everything about them . . . the design, the images that I had to work with, the colors  . . . all of it!  


Thursday, December 22, 2022

EASY SNOWGLOBE CHRISTMAS CARD


I have been wanting to share photos of this year's Christmas cards, and I finally had a chance today to process the pics I've taken.  I didn't have as much variety this year--maybe five designs--but I was quite pleased with each of them.  That matters!  This first one that I'm sharing is an easy-to-create snowglobe, which I learned from Tina Wardell's video.  In a nutshell . . . 

(1) Die-cut a circle from a scrap of cardstock that is the same size as my Crumb Cake layer.  The die-cut aperture will be used as a stencil.

(2) Take a sponge, dauber, or blending brush to lightly color the circle opening from the die-cut stencil that you created.  Before removing the stencil, draw around the opening with a white gel pen.

(3) Stamp the image of your choice inside the "globe".  Use the white gel pen to add snowy accents and falling snow.

(4) Use a Soft Suede Stampin' Write Marker to draw an ornament topper (if desired), and draw over it with a gold marker.  This card would have looked better without an ornament topper, but adding the die-cut base beneath the snowglobe was something that I decided to do AFTER I had already drawn the ornament tops.  😕  And just so you know . . . Tina's snowglobe was made as a hanging ornament and not something with a base.  FYI . . . For my snowglobe base, I used dies from Stampin' Up!'s retired "Still Scenes" bundle.  Isn't that die-cut base gorgeous cut from gold foil?


As you can see from the above photo, I did different things with the winter scene that I stamped inside the snowglobe. 


I'll bet you're wanting to try making a snowglobe, huh?  Go for it!  It's so easy, and you probably have on hand everything that is needed to make one.

Wednesday, December 14, 2022

BRINGING HOME THE CHRISTMAS TREE


While working on Christmas cards a few weeks ago, I remembered that I had a Cricut cut file for one of my most favorite cards.  As I went to Cricut Design Space to find the cut file, I came across the cutest wood-sided "Station Wagon Holiday Card" that I just had to make.  I changed nothing about it because it was just perfectly adorable already.  I am such a sucker for shaped cards (try saying that fast just for fun)!

Of course, the card was designed to fold flat for mailing, and the cut file even included an envelope!  If you often make Cricut projects, you already know that a lot of them call for lots of different colored cardstock or have lots of little cuts to be assembled, which means it's easy to make a bit of a mess just to make one card.  This card wasn't like that.  I think I used six different colors of cardstock/paper, and the cuts were designed in a way that was EASY to assemble.  This truly was a quick card to make!  Cutting the "wood" siding took the most time because of all those intricate cuts, but still . . . a quick project. The designer even included some stacked gifts to decorate the inside of the card:


Pretty cute design, huh?  I'll bet that you, too, would have gotten side-tracked and had to make one (or a lot) of these cards.  In case you're wondering, I did eventually locate the cut file for the card that I set out to make, and I'll share photos of that one soon.


Tuesday, November 29, 2022

ORIGAMI WREATH ORNAMENT


Who likes to make ornaments?

Today I'm sharing a relatively simple wreath ornament.  I say "simple" because the video tutorial that I followed by Ann Melvin was easy to understand and follow along.  The folds were easy, but the assembly was a little tricky.  I ended up using binder clips along the way to hold some of the pieces in place.  I also decided to add some embellishments and a greeting.


I'm usually mindful to not create green things to go on a green tree, but I goofed this time.  Ha!  I suppose I could hang this ornament somewhere else but, for now, it's the first ornament on my tree--that would be the tree that still needs 300 more lights wrapped around it before I can get on with the decorating.  My least favorite thing about a real tree is having to string the lights around it.  Ugh!

But . . . here's the ornament hanging on the tree.


Friday, November 25, 2022

TUTORIAL: EASY "JOYFUL FLURRY" CHRISTMAS CARD


Stampin' Up!'s "Joyful Flurry" bundle is such a pretty one, and today I have a step-by-step photo tutorial for (what I think) is a really pretty card.


On a 4" x 5-1/4" piece of white cardstock, stamp the second largest snowflake image five times in a (kinda, sorta) circular pattern using Bermuda Bay ink.  The objective is to create a wreath of sorts.  After inking the stamp, stamp off on a scrap piece of paper each time before stamping on the cardstock.  Don't worry about trying to stamp a perfect circle . . . everything is going to be just fine in the end.


Using Bermuda Bay ink, stamp the next snowflake image five times, filling in the gaps.  Don't stamp off this time--you want the images to be darker than the first snowflakes that you stamped.


If you have an embossing buddy, run it across the cardstock to leave a powder residue for this next step.  Ink the smallest snowflake image with VersaMark ink, and stamp the image on top of the first snowflakes that you stamped.  Sprinkle the images with silver embossing powder, and use a heat tool to melt the embossing powder.  Note:  Now is a great time to use a favorite embossing folder to add some texture to the cardstock.  I only remembered to do this on one of my cards.  🙁


Cut a 10" piece of silver cord, tie it in a bow, and use a mini glue dot to adhere it somewhere near the center of your stamped snowflake "wreath".  


From a scrap of white cardstock, cut the largest label die from the Frosted Flurry dies.  Cut the two small snowflakes from a scrap of foil cardstock.  I used a blue foil from the retired Noble Peacock collection, but use what you have.  Stamp the sentiment on the die-cut label using Bermuda Bay ink, and adhere it with Stampin' Dimensionals.  Use liquid glue or a mini glue dot to adhere the die-cut snowflakes.  Lastly, scatter some rhinestone jewels wherever you'd like. 


Use a distressing tool to rough up the edges of your cardstock.  I think this step adds a lot of texture and interest--especially if you forget to use an embossing folder.


All that's left to do is adhere the completed layer to the front of a card base, which measures 5-1/2" x 8-1/2", scored in the center at 4-1/4".  Easy peasy, right?!?!  What I really enjoyed about this card design is that it was quick to make multiples.
I'd love to know if this is the kind of card you'd enjoy making and sending this year.

The "Joyful Flurry" bundle is quite a pretty one, and there's still time to order it and make your Christmas cards.



Sunday, November 13, 2022

"CHEERFUL BASKET" THANK YOU CARD


Is it true that I haven't posted anything since October 24th?????  I knew that it had been a while, but I wouldn't have guessed it had been that long.  I must try to do better and post a little more often.  Today I'm sharing a thank you card that I made recently, and it features Stampin' Up!'s "Cheerful Basket" stamp set and coordinating dies.  Isn't that a fantastic basket?!?!  


Making this card was the first time that I have used these products, but it won't be the last.  This bundle is designed to be oh-so-easy to use, which also means that it makes card-making relatively quick.  Since I mailed this card immediately after making it, I can't really remember what I used to color the basket and apples, but I'm fairly certain that I used ink pads and a water brush.  The die-cut apples in front of the basket were cut from cardstock, and I used a sponge to darken the edges.


Of course, I had to include a die-cut tag because it looked good on the card . . . and also because I 💗 the Tailor Made Tags dies.  The designer paper featured on my card is from the Happy Forest Friends collection, which seems to be the DSP that I reach for quite often.

Thanks for visiting my blog today, and I hope that you will visit again soon!  

Happy stampin'!

Monday, October 24, 2022

BIRTHDAY CARD FEATURING ALCOHOL TECHNIQUE WITH STAMPIN' BLENDS


I recently read about an alcohol technique with Stampin' Blends markers and was anxious to try it.  Have you heard about it--or tried it?  It's quite cool . . . especially when done correctly, which I didn't quite do.  Basically, you just use the markers to color circles on a piece of Vellum cardstock, place a few drops of alcohol (at least 91% Isopropyl) onto the vellum, and then use a water brush (dipped in alcohol or an Aqua Painter filled with alcohol) to move the colors around.  You can also blow through a straw to move the alcohol around on the vellum, which I found to be very easy.  Although I used dark/vivid marker colors, my colored circles became muted when my Aqua Painter, which had water in the barrel, decided to dispense water even though I didn't squeeze the barrel.  Argh!  Although I wasn't 100% pleased about the water situation, I had to continue with my colored vellum creation because the card needed to get in the mail, and I had a job to go to.

Since my marker colors got diluted, I just rolled with the pastel palette.  I think it ended up being a pretty card, don't you?  Additional products featured on this card include the Happy Birthday die (retired Stampin' Up! product), Crystal Distortion embossing folder (Simon Says Stamp), absolutely GORGEOUS Adhesive Backed Sequins & Gems (Stampin' Up!), Metallic Edge Ribbon (Stampin' Up!), and the lattice die-cuts from the Chick dies (retired Stampin' Up!).

A white gel pen was used to accent the die-cut sentiment.  It lends a festive flair, right?  And just look at those pretty sequins!

If you have Stampin' Blends markers, definitely give this technique a try!  Oh . . . I think you'd figure out that the side of vellum that you color on is the back side but . . . I should mention that just in case you wonder.  ;-)

Until next time . . . have a stampin' good day!