Monday, November 8, 2021

WHAT'S COOKIN'?


I needed to make a birthday card last week.  I tried and tried to talk myself into using a stamp set that might be a little more perfect for the occasion, but I couldn't resist using some of my newest products.  And maybe the most important thing is to receive a card in the mail, regardless of whether it has a whisk and cutting board on it.


I really liked the card and wish the photos had turned out better!  The card has its fair share of texture, dimension, and bling and features the following Stampin' Up! products:

Cardstock:  White, Coastal Cabana, Crumb Cake, Soft Sea Foam

DSP/Specialty:  Red Velvet, Bloom Where You're Planted

Stamp Sets:  What's Cookin', Stitchery

Ink:  Crumb Cake, Bermuda Bay, Coastal Cabana

Sizzix:  Cookin' dies

Accessories:  Linen Thread, Stampin' Dimensionals

It's hard to tell from the photo, but the little red heart was punched from Red Velvet paper, and I thought it was a sweet finishing touch.  

As for the What's Cookin' bundle . . . it's been on my wish list since I first saw it, but I just wasn't sure that I'd use it very much.  When Stampin' Up! discounted the cling mount stamps recently, I took that to mean that fate was giving me a nudge, so I also purchased the dies and threw in the Stitchery stamp set for good measure.  

So what do you think?  Would you have sent this as a birthday card?

Sunday, October 24, 2021

"SPARKLE OF THE SEASON" FALL CARD


Have you noticed the Sparkle of the Season bundle in Stampin' Up!'s catalog?  It was so well-designed for Fall and Christmas with dies that cut three different styles of wreaths (that's a word that you only want to read and not have to pronounce) and an assortment of images [stamps and dies] for Fall, Thanksgiving, Halloween, and Christmas.  The only shaped element featured on my card that is not part of the bundle is the 3-leaf image from a retired punch because . . . well . . . I just wanted a little something else to put there.  


It's a lovely card, right?  I used two die-cut Soft Suede wreaths, which were stacked one on top of the other, and then I lightly sponged ink on the die-cut leaves and pumpkin.  My cardstock color for the leaves were Blackberry Bliss, Garden Green, and Crushed Curry.  Of course, Pumpkin Pie cardstock was used for the pumpkin, and the Early Espresso Stampin' Write Marker colored the stem beautifully.  I used one of the Tailor Made Tags dies to cut the tag, and the word "grateful" was stamped with VersaMark ink and then embossed with gold Stampin' Emboss Powder.  The Very Vanilla cardstock layer was embossed with the Timber embossing folder, and you can see that detail better in the photo below:


The finishing touch to this card was the placement of Champagne Rhinestone Basic Jewels in a waterfall pattern.

"Sparkle of the Season" Bundle


Friday, October 8, 2021

"FRIENDS ARE LIKE SEASHELLS" + "GIVE IT A WHIRL"


It's been a minute since I last shared a project and . . . yes . . . this is another card featuring the oh so fun Give it a Whirl dies coupled with Stampin' Up!'s Friends are Like Seashells stamp set.  Of course, I had to also include a tag cut from my very favorite Tailor Made Tags dies.  Have you purchased the tag dies yet?  Your projects are sorely missing out if you haven't!  I almost forgot to mention that this card also features the Thanks & Hello embossing folders.  

As you can see, the spinning circle was sandwiched between the layers, but this didn't add a lot of bulk.  This is something to really appreciate when it comes time for mailing.  Ready to see all of the seashell images that I stamped on the die-cut circle?


All of the products featured on this card are listed below:

Stamp SetFriends are like Seashells

DiesTailor Made Tags, Give it a Whirl

Embossing FolderThanks & Hello

Cardstock:  White, Crumb Cake

Designer Series Paper:  Sand & Sea

Ink:  Crumb Cake, Sahara Sand, Petal Pink, Soft Sea Foam, Pool Party

Punch:  1" Circle (on the back of the spinning circle)

AccessoriesTake Your Pick tool, Stampin' Dimensionals, Foam Adhesive Strips, Round & Square Brads (hidden by the tag), Blending Brushes (to lightly color the embossed words), Sequins (non- Stampin' Up!), and Twine (non-Stampin' Up!)


Wednesday, September 22, 2021

"GIVE IT A WHIRL" FALL DESIGN


I'm not one of those people who love Summer.  As a matter of fact, it's my least favorite season.  I don't like to be hot, and I really don't like all of the creatures that come crawling out and slithering around to enjoy the hot, humid heat.  Now that it is September, I am REALLY looking forward to Fall.  Go ahead, Summer!  Pack your bags and go!  

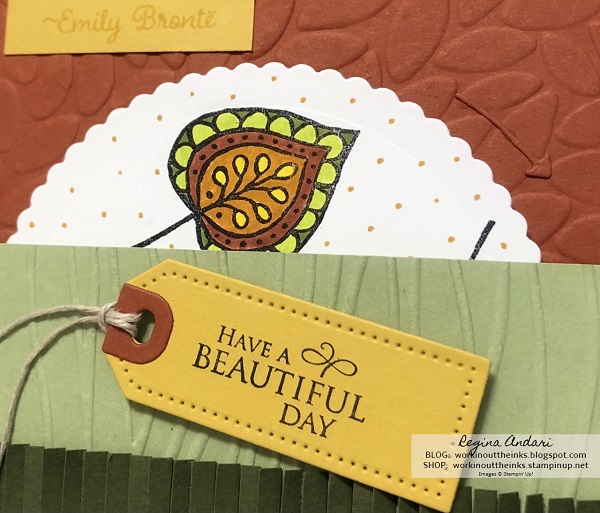
Today I'm sharing a card with Fall colors and images that I created for my parents.  I used the same layout as in my previous blog post because I thoroughly enjoy using the Give it a Whirl dies this way.  The images on my card are from Stampin' Up!'s retired Lighthearted Leaves stamp set, and they are quite fun to color.  The following three photos show each of the images that I used:


Didn't they turn out so pretty?  After the images had been colored, I dotted the white background with one of the markers, which I thought added extra whimsy and interest.  Of course, I used the Tailor Made Tags dies to cut that gorgeous little tag, and the sentiment is from the Very Versailles stamp set.  The embossing folders featured on this card are Seaside and Petal Burst.  My cardstock colors are Cajun Craze, Crushed Curry, Pear Pizzazz, Mossy Meadow and, of course White.  Other Stampin' Up! products that I used are Stampin' Dimensionals, Foam Adhesive Strips, Round & Square Brads, and the Take Your Pick Tool.  This card just screams "Welcome, Fall!!!", doesn't it?


A funny thing . . . when I showed this card to my son, he just looked at it, said it looked good, and handed it back to me.  When I told him that he was supposed to spin the white circle in the direction of the arrow, he said, "What arrow?!?!"  LOL  Granted, I knew it wasn't a very good idea to make the arrow the same color as the embossed background, but I didn't want a lot of visual attention on the arrow.  Before mailing the card, I outlined the bottom (of the arrow) with a black ink pen--very lightly.  My mother said she almost didn't see it, so I guess I'll need to do better the next time.

Monday, September 13, 2021

"GIVE IT A WHIRL" ANIMAL BIRTHDAY CARD


Today is my great-nephew's birthday, and I'm sharing the card that I made for him.  I was totally inspired by a similar card that Brenda Quintana designed, but I couldn't resist making a few changes such as including a cute donkey, some hatching chicks, and a balloon in the hoof of the proud sheep.  I also thought the die-cut fence provided an excellent opportunity to use some of Stampin' Up!'s new Cork paper, and didn't it work perfectly for the fence?  Because the cork paper is thin, I adhered it to a piece of cardstock before die-cutting the shape.  In the image below, you can see the other two images that come around when the scallop circle is turned.  

It's hard to tell from the photos, but I used the Wink of Stella glitter brush to apply thin lines of glitter around the die-cut clouds and also on the balloon.

The Give it a Whirl dies are so fun to use!  While there are so many options with those dies, this is the quickest card that I've made with them.  Best of all . . . the set of dies includes some of the prettiest clouds that I've ever seen plus some other shapes that can be used on all sorts of cards.  You know how some dies are just a great investment?  Uh huh . . . these are that!  Other Stampin' Up! products featured on this card include:

Cardstock:  White, Old Olive, Pool Party, Daffodil Delight

Stamp Sets:  Counting Sheep, Darling Donkeys (2021 SAB, retired), Hey Birthday Chick

Dies:  Sheep, Give it a Whirl


Thursday, August 26, 2021

STAMPED WREATH CARDS


Not much to talk about today--just wanted to share photos of the wreath cards that I made recently.  My ink and cardstock colors (from Stampin' Up!) are:  Old Olive, Soft Suede, Gorgeous Grape, Highland Heather, Pear Pizzazz, and VersaMark (for the stamped sentiment, which is from the Heartfelt Wishes stamp set).

These little square cards were kept very simple so that the stamped wreath got all of the ahhhhh's.  I used Iridescent Ice embossing powder (retired product), which gave the sentiment a little sparkle.  


Of course, the envelopes needed to be pretty, too, so I stamped a bucket of flowers, some of which had spilled out.  


A few days later, when I was ready to mail a candy bag zipper pouch to my niece, I made this card for her.

The jewels are really pretty, and I wish they showed up better in the photo.  They're Stampin' Up!'s 2021-2023 In Color Jewels, and they come in a nice selection of colors.

Monday, August 23, 2021

ANOTHER CANDY BAG ZIPPER POUCH


My mother had saved a KitKat candy bag that my niece sent to her a while back and, after seeing my first candy bag zipper pouch, she thought I might like to turn this bag into a useable pouch.  How fun that this bag was a bit larger, but the conversion process was a bit tricky because the bag was made from paper.  Mostly, it turned out very well, with just a little tearing.  The biggest tear was in the bottom left corner, and the only remedy that I could think of was to sew a little tab there.  


I found what appeared to be the perfect fabric to use for the lining.  It looks really nice with the bag, huh?  Want to see the bag of the bag?


Once complete, I wrapped the pouch with glassine paper and made a wax seal closure over the twine bow.


The stamped rose didn't show up very well, so I colored the top of it with a gold Sharpie marker.


This little treat was all ready for the USPS to deliver to my niece in Michigan.  Being that the package was totally unexpected, she was surprised and delighted--and recognized that the bag was one (once filled with candy) that she'd sent to my mother.  Being able to surprise someone and make their day a little sweeter is one of the best things in life.  

Wednesday, August 11, 2021

UPCYCLED PROJECT: CANDY BAG ZIPPER POUCH


If you're visiting my blog to see a stamped project, I'm afraid you'll be disappointed.  Or . . . if you're someone who enjoys sewing as well as stamping, this post might inspire you to take the cover off of your sewing machine.  My mother told me recently about a Missouri Star Quilt Company video that she thought I might like, and she was right!  I can remember seeing similar projects years ago (long before I started sewing) that were made from cookie and chip bags, and I'm pretty sure I also saw something made from drink pouches.  They might not have been sewn, but they were a creative upcycled project.


For my zipper pouch, I followed MSQC's instructions (here's the video link) and cut apart the candy bag.  The one that I had purchased had a pleated bottom, but it was easy to cut that out.  Also, I didn't tear the top of the bag to remove the candy--I cut a slit in the bottom so the majority of the bag was left intact.  As you can see from the above photo, I used the front and back of the candy bag for my pouch.


Per the video instructions, I applied clear Heat-n-Bond Iron-On Vinyl to the bag, sandwiched each piece (front and back) with batting and lining fabric, and then machine-quilted.  The vinyl that I used was "Gloss" and, as you can see, it left the project quite . . . well . . . glossy.  


As someone who is new to sewing and hasn't been building a fabric "collection" for very long, I was thrilled to find that I had a perfect fabric for the lining.  Just look at how well the colors coordinate with the bag!  I even had the perfect pink zipper, but that wasn't too surprising because I have a drawer full of zippers--probably will never use them all, but I'm gonna try.

So what do you think about this cute zipper pouch?  Are you inspired to make one?


Sunday, July 18, 2021

IT'S A (ROCKIN') CHRISTMAS CARD


What do you do when new Christmas-themed products arrrive?  You make a Christmas card--even if it's a wee past the middle of July.  Can you tell from the photo above that the focal point is a round "ornament"?  


I used a circle die to cut the Sahara Sand cardstock base, which was folded in half and then embossed with Stampin' Up!'s brand new Merry Melody embossing folder.  The ornament was created by using a retired Circle punch to cut a piece of the gorgeous Tidings of Chistmas designer paper.  Both pieces of designer paper on the ornament are from that paper collection, and I 💗 the colors for Christmas . . . Cherry Cobbler, Evening Evergreen, Misty Moonlight, Sahara Sand, and Soft Succulent.  The greens are so pretty together!  To create the topper for the ornament, I used one of the dies from Perfect Plants to cut that shape from Silver Foil.  It's perfect, right?!?!  


The sentiment is from the Poinsettia Petals stamp set and was stamped with Evening Evergreen ink.  Notice the texture on the Soft Succulent trees?  I used the new Timber embossing folder for that.  I almost didn't purchase that folder, thinking that the Bark folder was all the wood texture I might need; however, I am loving that the Timber folder has a smaller "grain" which is quite perfect for my tiny trees.  This little rocking card was quite simple and quick to make, and I love that it's stylish and festive.  I have a feeling that I'll be making more ornaments--and rockers to display them.

Tuesday, July 6, 2021

"SWEET AS A PEACH" PURSE CARD W/MONEY POCKET


Sunday, July 4th, was my niece's birthday.  Being born on Independence Day--a day celebrated with fun family/friend gatherings, fireworks, and parades--is such a perfect day for Haley's birth.  She is such a sweet, bubbly, and funny young lady and brings joy to our family.  She loves big, and I hope she knows that she is very loved.  She is truly a ray of sunshine!  My sister and I always say (jokingly, of course) that Haley is our parents' favorite, but I've decided (shhhh . . . don't tell anyone) that it's okay if she is because I can see how she would be.  It's no surprise that they call her Precious.  And she really is--to all of us.  For her birthday, I created this sweet purse-shaped card featuring Stampin' Up!'s Sweet as a Peach stamp set, Peach dies, and You're a Peach designer paper:

It was perfect because it stood on its own when closed and folded flat for mailing.  BTW, I used Soft Sea Foam for the card base.


In the above photo, you can see that the card had a Velcro closure.  The top part of the card had a pocket (created with the striped designer paper) which was perfect for holding $$$.  Can you see that an envelope was tucked into the pocket? (Photo below)  The bottom panel, although sweetly decorated, had plenty of space for writing our birthday wishes.  Yes, that adorable tag was cut with one of the Tailor Made Tags dies.  💗 those dies!!!

Pocket with envelope tucked inside

Because the envelope blended in a little too well with the other designer paper on the top interior panel, I decided to add a Calypso Coral tab to the top left corner:


All of these peach products are sooooooooooo fun to work with, and I don't think it's possible to make anything ugly with them.  

One last photo of Haley's birthday card: